20 Upcycled Furniture Ideas for Beginners
Hey there! So you’ve scrolled past one too many “gorgeous furniture flip” reels and now you’re staring at that old dresser in your garage thinking, “I could totally do that… right?”
First off, you absolutely can. Second, let’s be real—not every project needs 17 layers of milk paint and gold leaf. I’ve been there, covered in paint that definitely said “easy wash-off” on the can (liars).
So, let’s ditch the intimidation and dive into 20 totally doable ideas. I’m talking simple tools, forgiving techniques, and max satisfaction. Grab your safety goggles (seriously), and let’s get into it.
1. The Good Ol’ Dresser Revival

Strip off those old knobs, give it a good sanding, and slap on a coat of vibrant paint. Suddenly, that boring brown box is a statement piece for your bedroom or entryway. New hardware is like jewelry for furniture—it changes everything.
Personal Fave
I turned my grandma’s dated dresser into a bright blue media console. A fresh color and some modern pulls made it look expensive, and I didn’t have to fuss with the structurally-solid bones. Win.
2. Pallet Wood Coffee Table
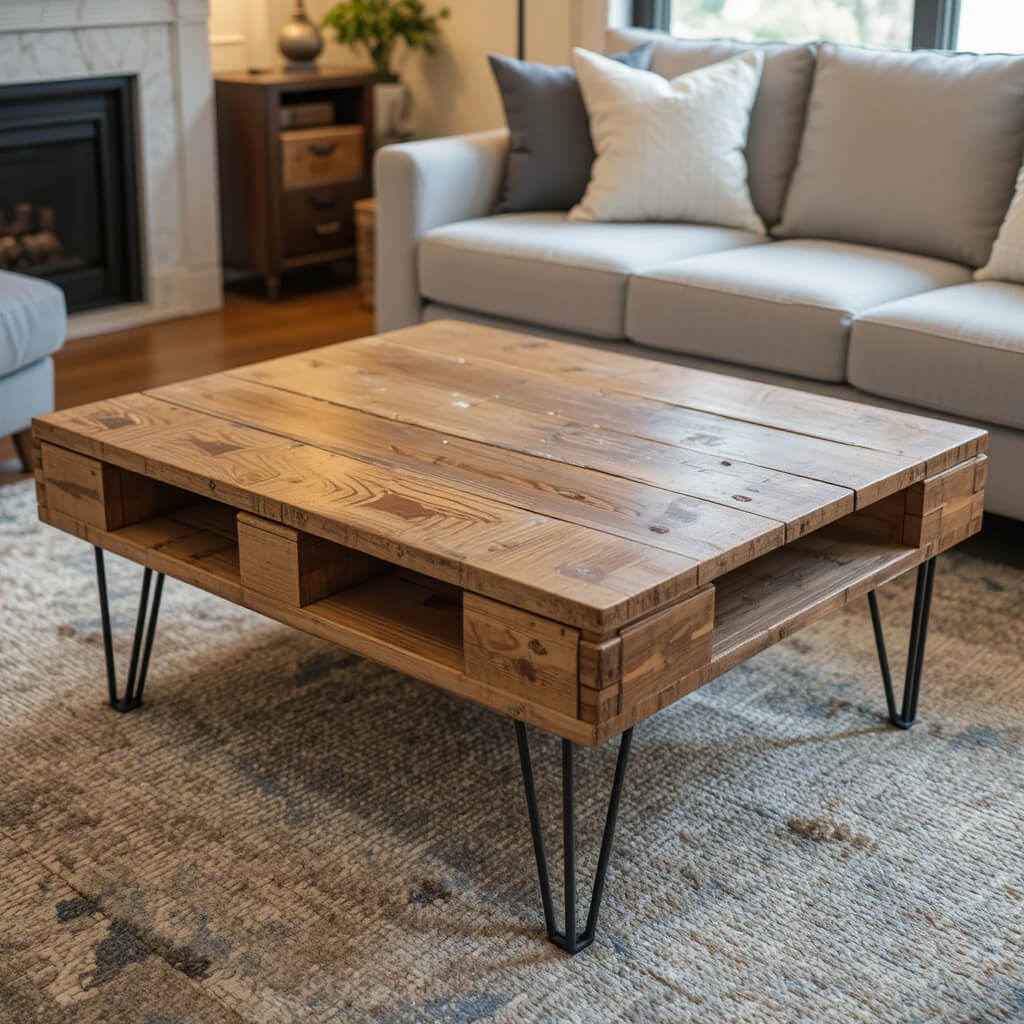
Source a couple of free pallets (check marketplace listings!) and break them down for the wood. Bolt the planks together for a rustic top, and screw on some hairpin legs you bought online. Boom—industrial chic on a budget.
Pro Tip
Always, and I mean always, check pallets for the HT stamp (Heat-Treated), not MB (Methyl Bromide). You want wood, not a chemical hazard, as your new tabletop.
3. Chair Cushion Makeover
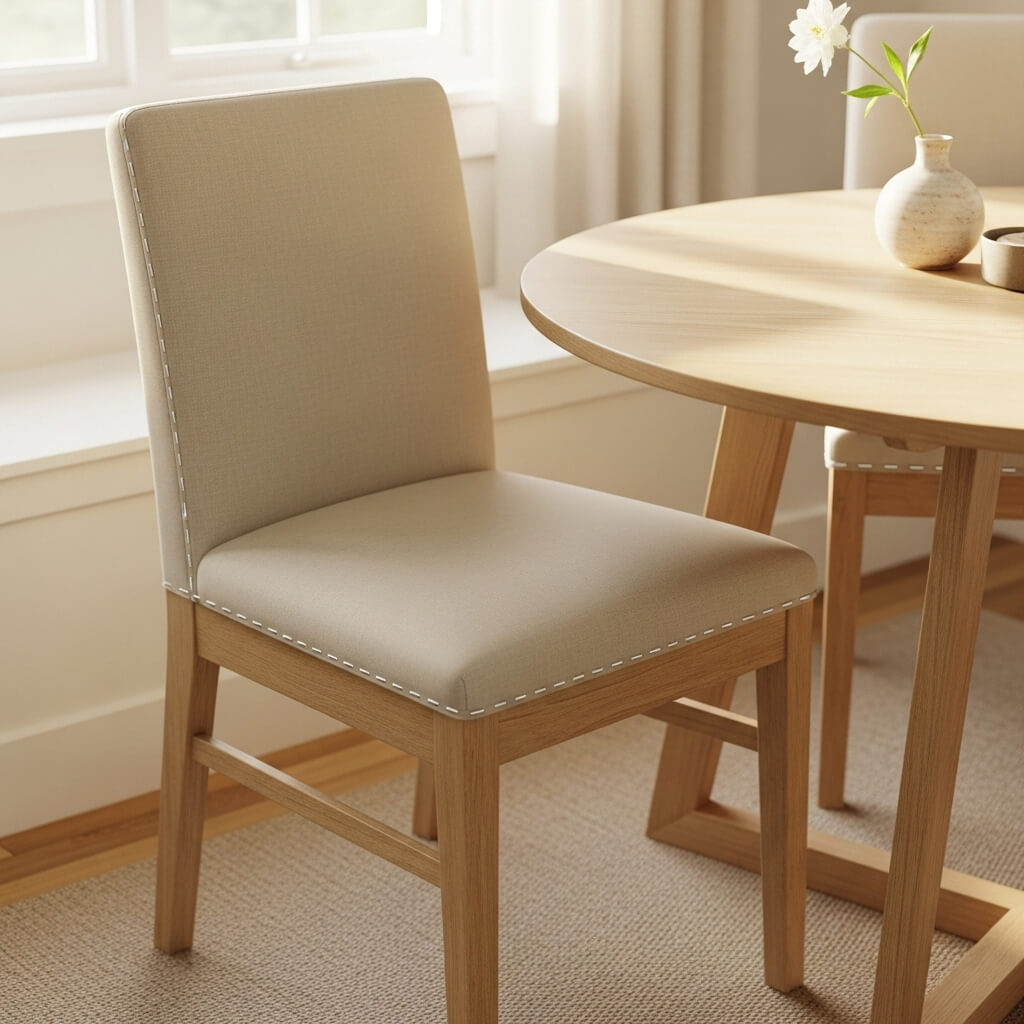
Got a dining chair with a sad, stained seat? This is the easiest win. Unscrew the seat, staple-gun some fun new fabric over the old padding, and reattach. It takes 10 minutes and feels like magic.
Story Time
My first attempt used a fabric with stripes. Let’s just say “aligning patterns” is a skill I did not have. Solid colors are your beginner BFF.
4. Nightstand from a Stool

Find a sturdy, maybe-ugly stool at a thrift store. Add a circular piece of plywood on top (painted to match) for more surface area. Suddenly, you have a quirky, perfect-height nightstand.
Personal Take
IMO, this works best with a stool that has a shelf. That lower tier is ideal for stashing your bedtime book or hiding charging bricks.
5. Bookshelf from Wooden Crates
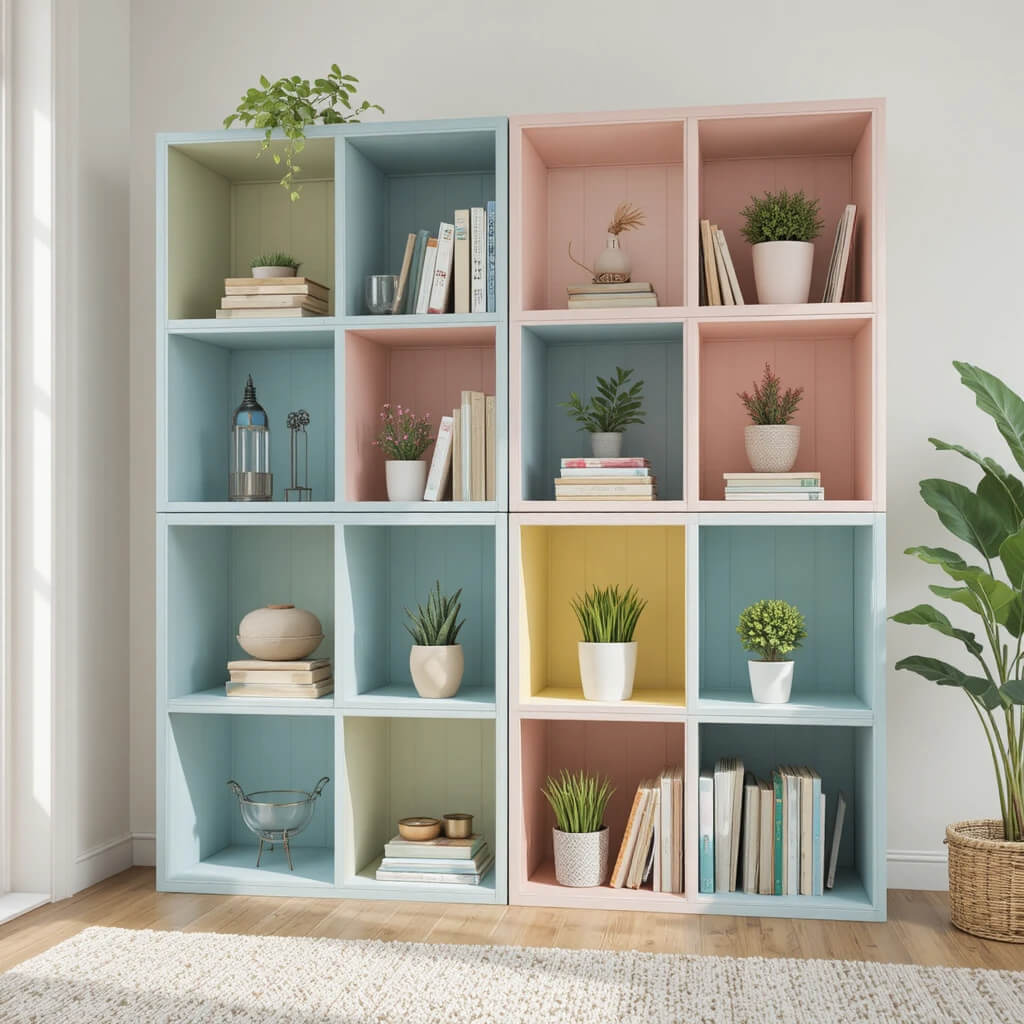
Nail or screw four small wooden crates together in a square formation. You can leave them raw for a farmhouse look or paint each crate a different pastel color. It’s modular, cheap, and holds all your stuff.
Pro Move
Stagger the orientation of the crate openings. Face two outwards and two to the sides for dynamic, visually interesting storage.
6. Bar Cart from an Old Suitcase
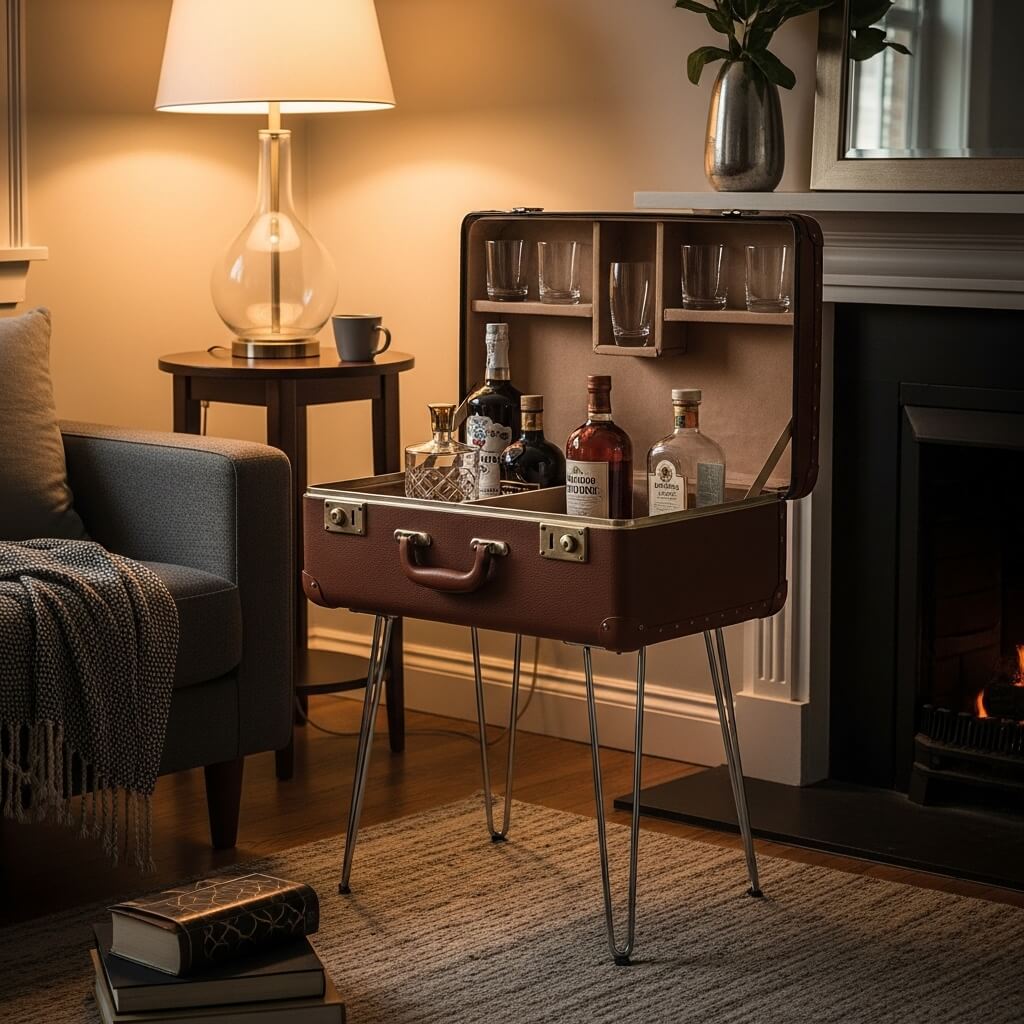
Grab a vintage hard-shell suitcase, flip it on its side, and attach two small hairpin legs to the bottom. Use the inside for glass storage and prop the lid open to display your fancy bottles. Cheers to that!
Downside
It’s not the most spacious bar, but that’s kind of the point. It forces you to curate a selection of only your favorite spirits. No junk allowed.
7. Spice Rack from a Wooden Shutter
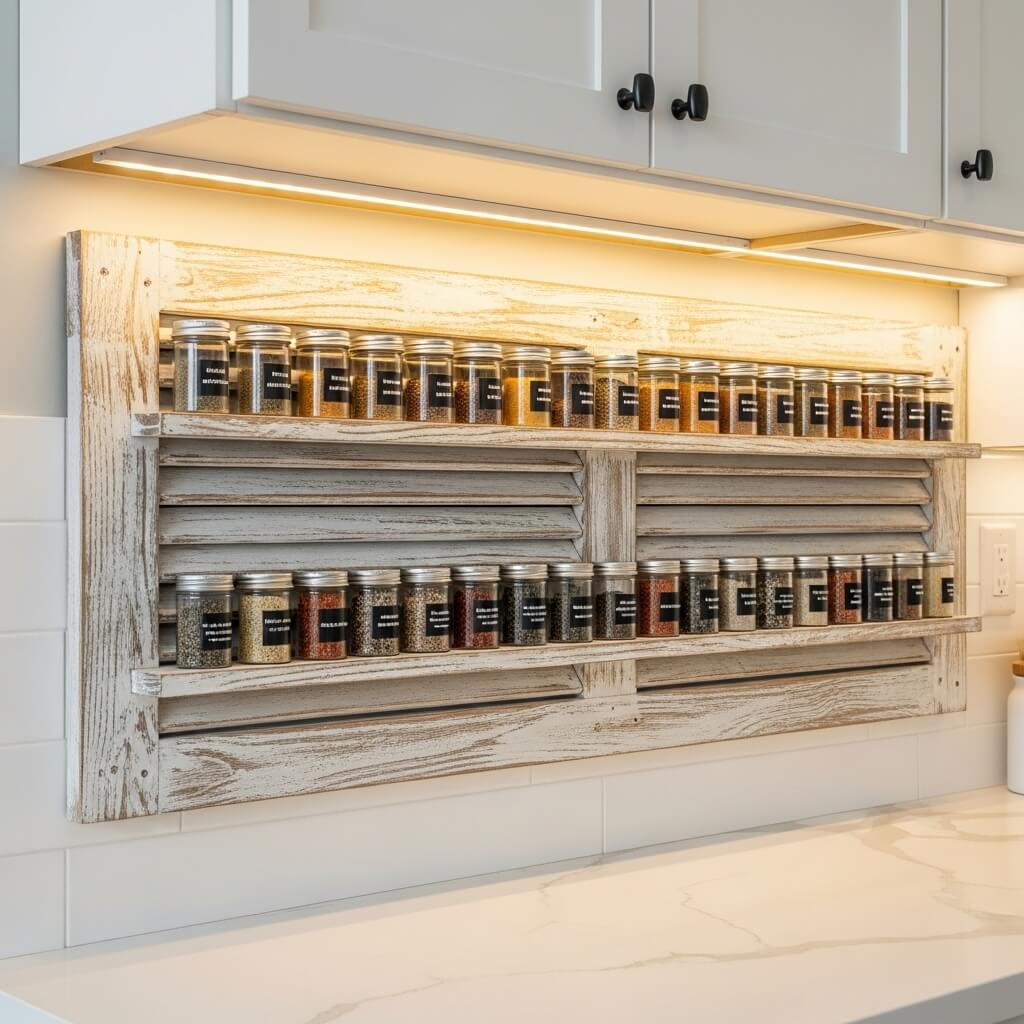
Mount a small, clean wooden shutter horizontally on your kitchen wall. The slats create perfect little shelves for your spice jars. It adds texture and saves precious cabinet space.
FYI
Give it a light sand and a wipe with mineral spirits first. You don’t know where that shutter’s been, and neither does your oregano.
8. Plant Stand from a Ladder
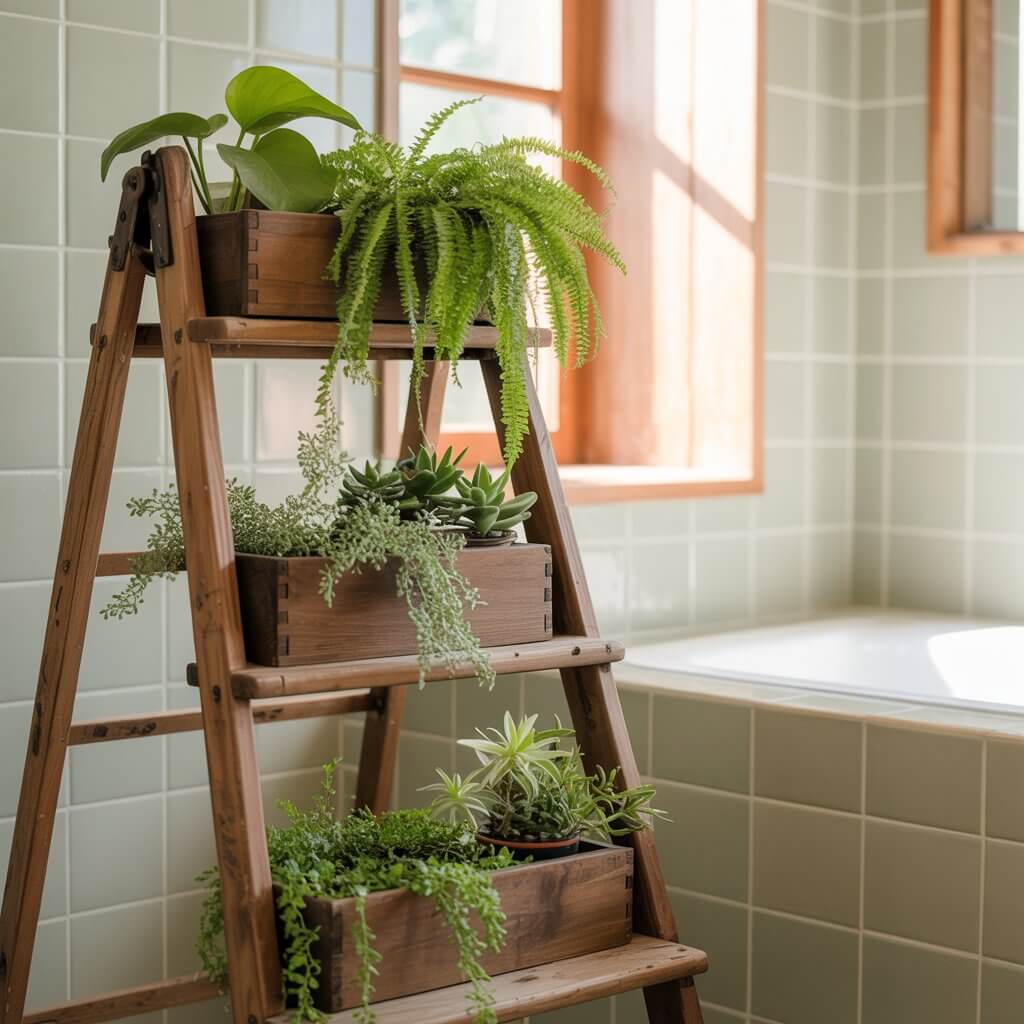
An old wooden step-ladder is a ready-made, multi-tiered plant stand. Sand it down, maybe give it a protective coat of oil, and arrange your plant babies on the steps. Instant indoor jungle vibes.
Personal Fave
I use a tiny one in my bathroom. The steps are perfect for trailing plants, and it makes the whole room feel like a spa. Well, a spa with toothpaste splatters.
9. Entryway Bench from a Bed Frame
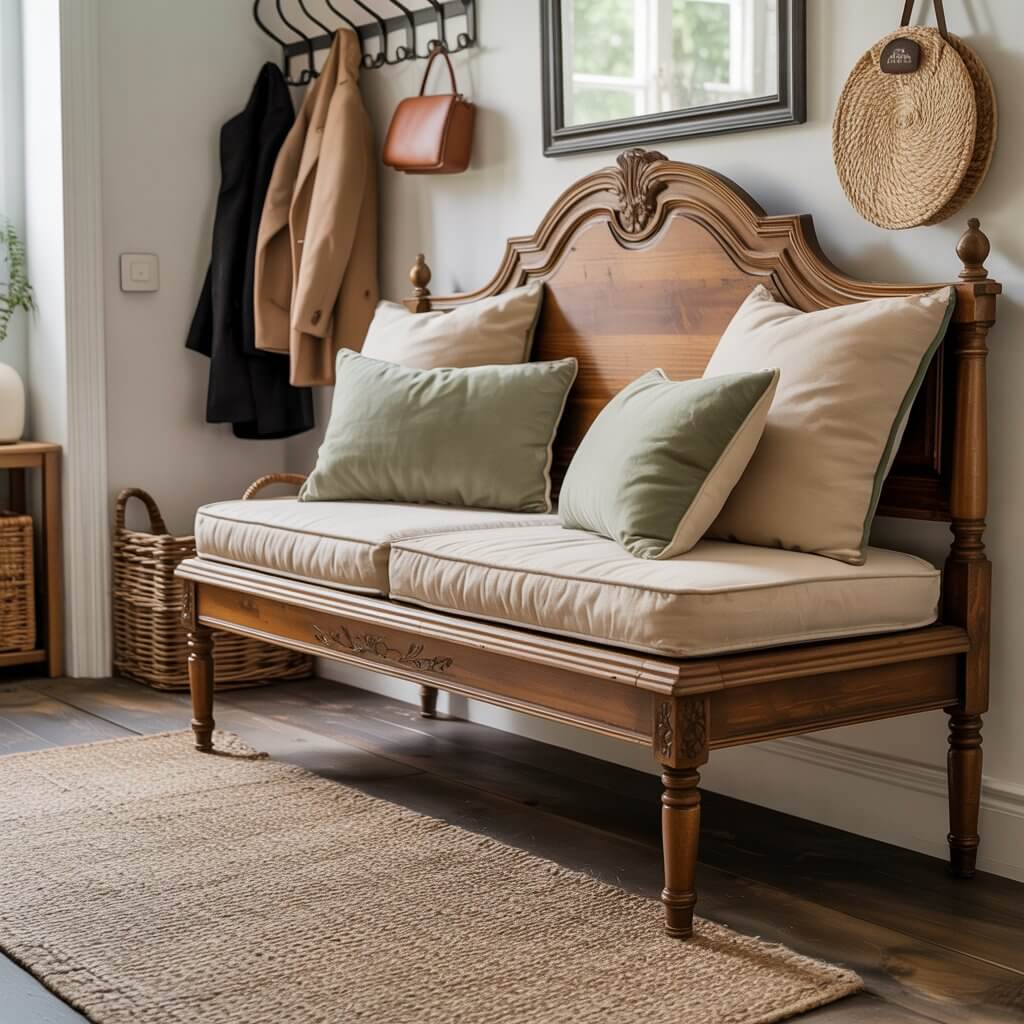
Use the solid headboard as the backrest and the footboard as the front legs of a bench. Get a carpenter to cut a simple wood seat to fit, or just attach a pre-made plank. Add cushions for comfort.
Pro Tip
This sounds advanced, but it’s mostly just clever assembly. The hard part (the beautiful frame) is already done for you at the thrift store.
10. Floating Shelves from Drawers
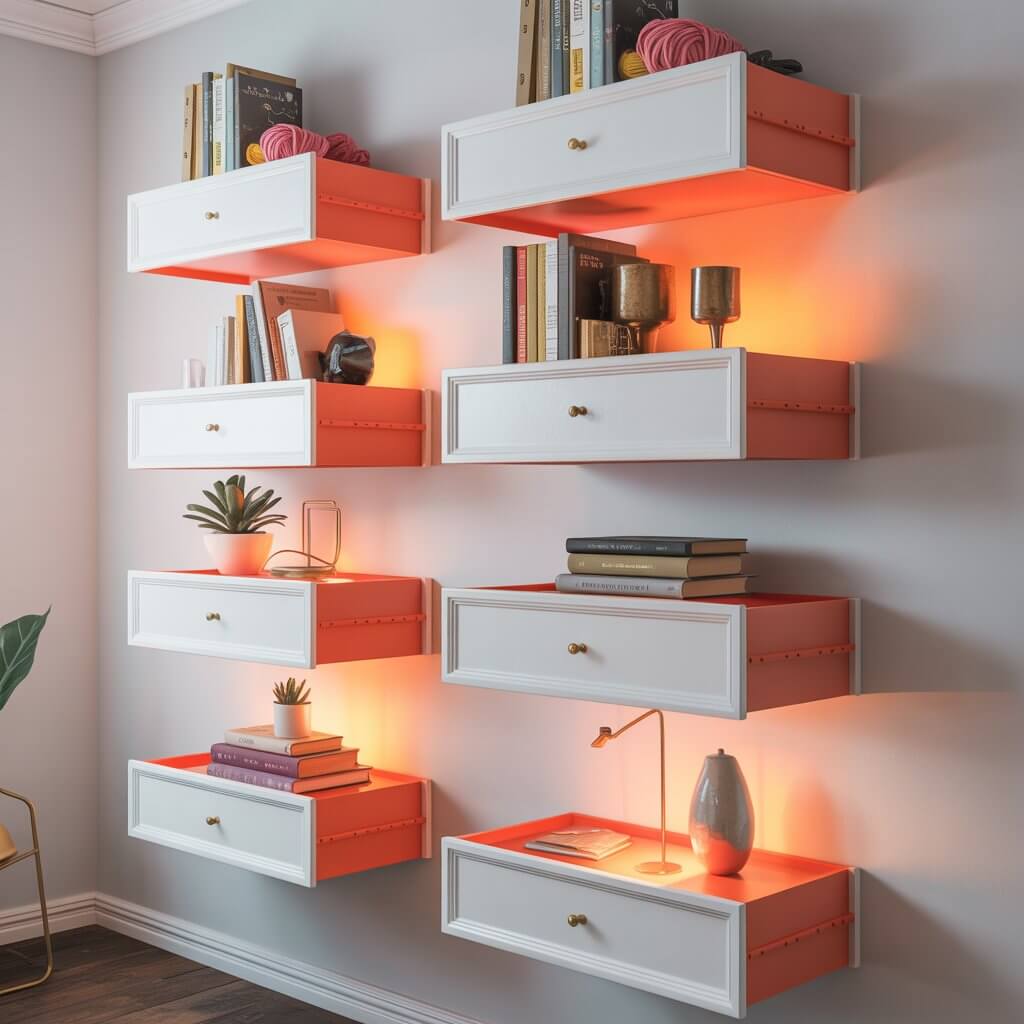
Pull drawers out of a broken dresser, sand them, and paint the insides a fun color. Mount them directly to the wall for deep, quirky floating shelves. They’re amazing for displaying collections or storing towels.
Story Time
I did this in my office for yarn storage. The depth is perfect, and the painted interior adds a surprise pop of color. It’s my most-complimented “shelf.”
11. Pet Bed from a Wooden Crate
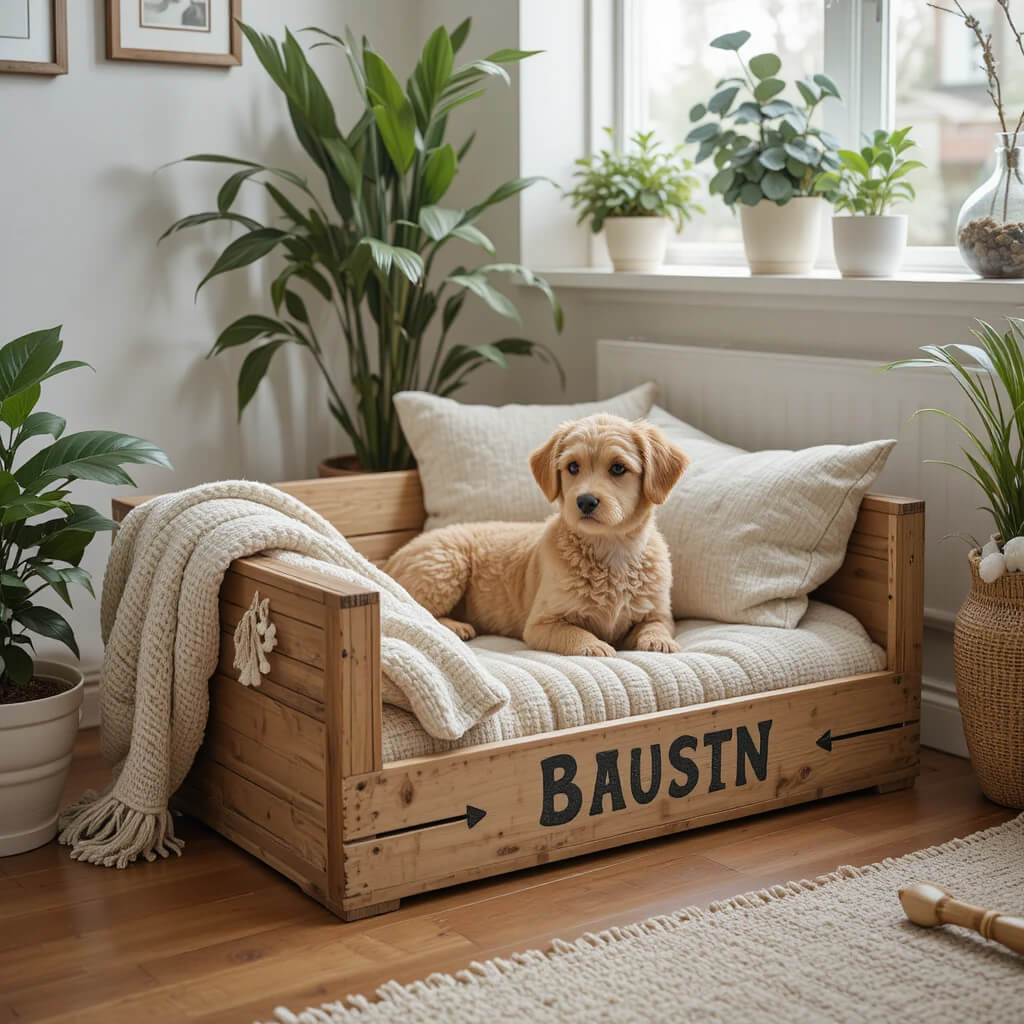
Line a medium-sized wooden crate with a soft cushion or old blankets. Sand the edges so they’re smooth, and maybe stencil your pet’s name on the side. Your furry overlord will finally have a throne.
Personal Take
Cats, in their infinite mystery, will sometimes prefer the box the crate came in. You’ve been warned.
12. Desk from a Solid Core Door
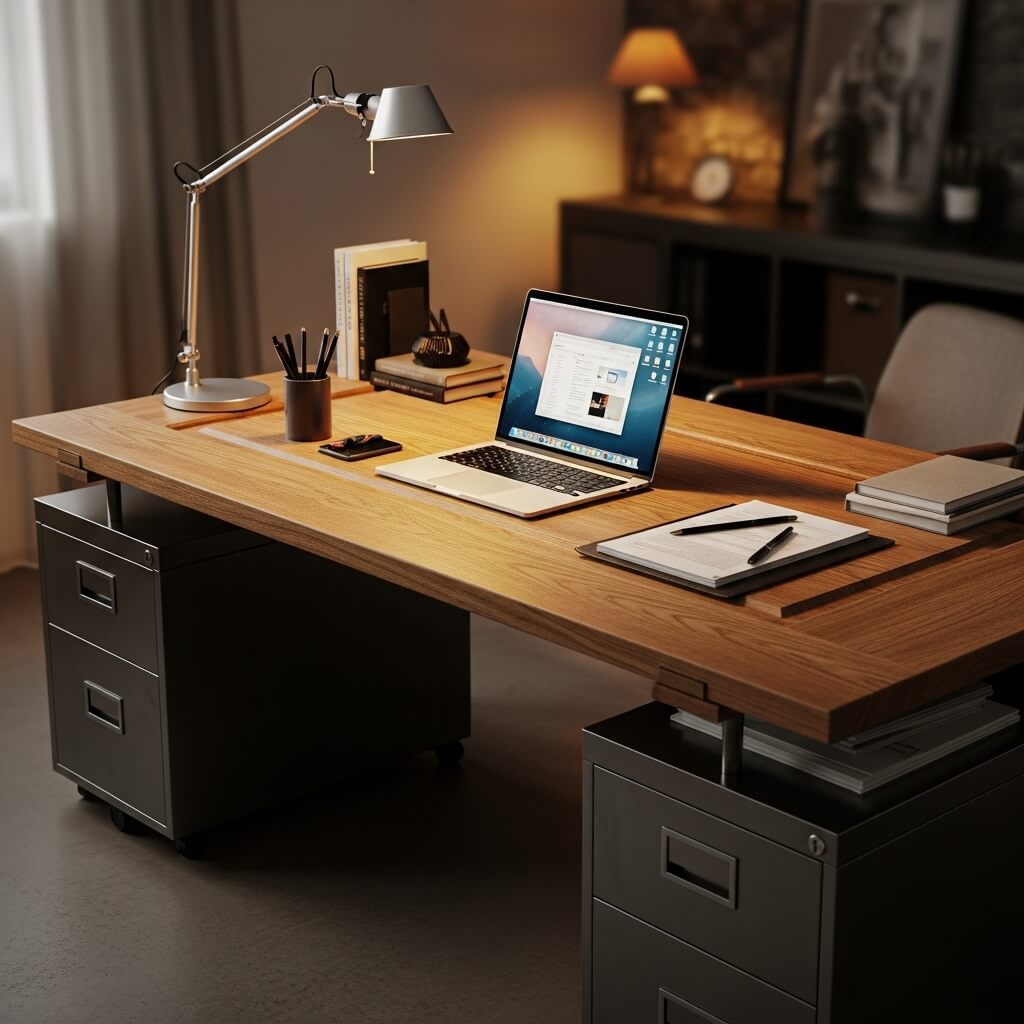
Lay a vintage solid-core door across two matching file cabinets or simple trestles. You now have a massive, sturdy desk for about $50. Finish the wood with polyurethane for a smooth work surface.
Pro Move
Drill a neat hole near the back corner to run computer cords through. It’s the little details that make a hack look intentional and polished.
13. Ottoman from a Tire

Clean a tire thoroughly, wrap it in thick rope or cord (using a hot glue gun), and add a circular cushion on top. It’s an ultra-durable, bohemian-inspired outdoor or kids’ room seat.
Downside
It’s heavy. Like, really heavy. Once you place it, you’re not moving it for a casual vacuum. Choose its forever home wisely.
14. Peg Rail from an Old Rake
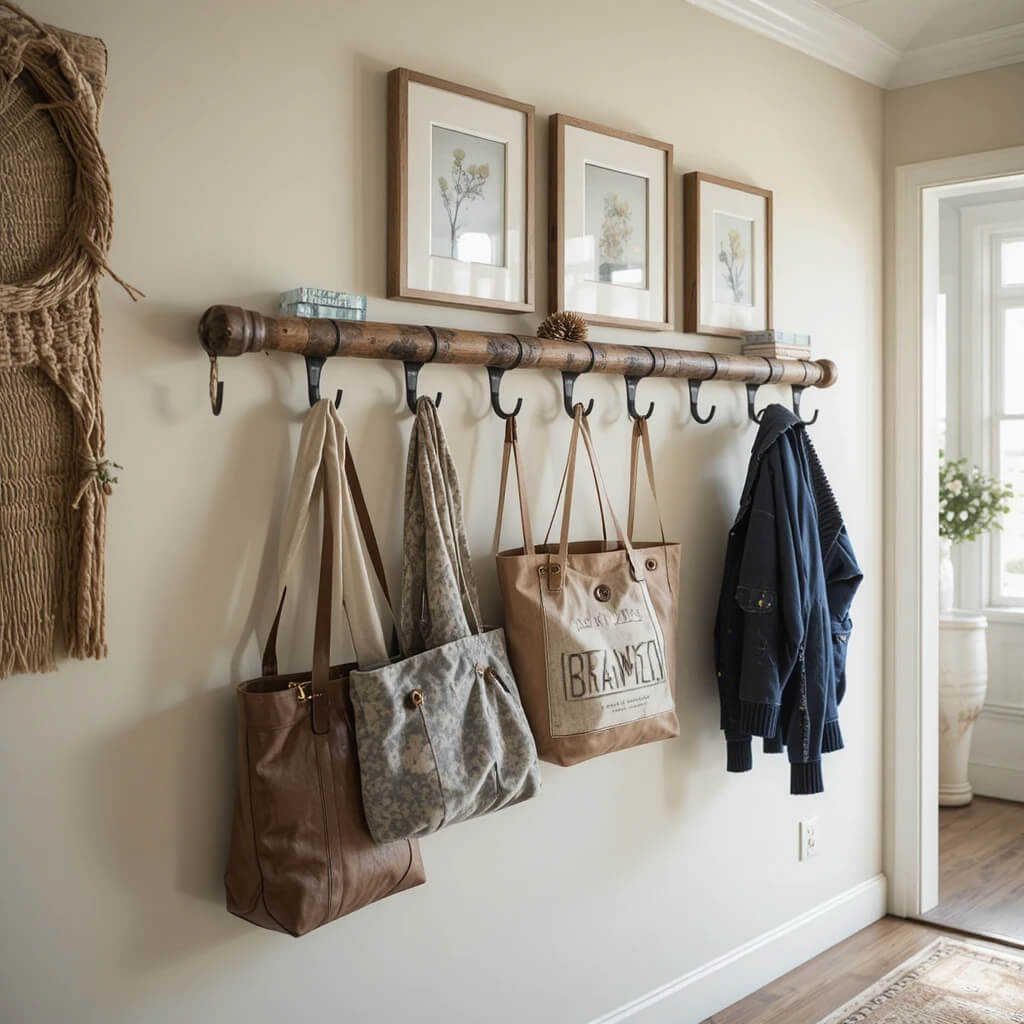
Remove the metal head from a wooden rake handle. Sand and finish the long handle, then screw in some simple pegs. Mount it on the wall for a rustic, functional coat rack. See? Gardening tools can be decor.
FYI
This works with any interesting long piece of wood—an old fence post, a scrap of barn wood. The pegs do all the work.
15. Side Table from a Stack of Books
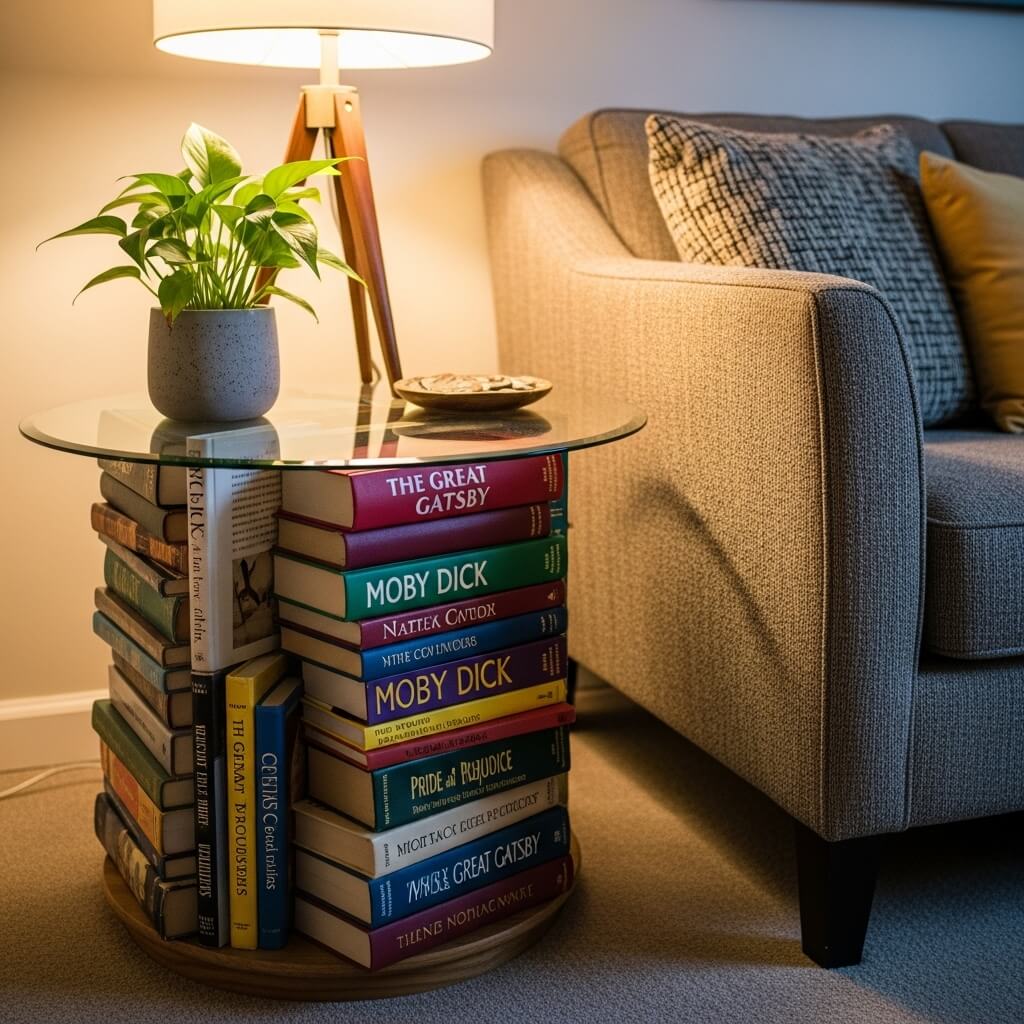
Grab three or four large, hardcover books you’ll never read again (we all have them). Glue them together spine-out with strong adhesive, then glue a glass or wood circle on top. It’s a literary conversation starter.
Personal Fave
I used old atlases for this. The colorful spine patterns look awesome, and it’s a great way to repurpose something otherwise destined for the landfill.
16. Wall Hooks from Wrenches
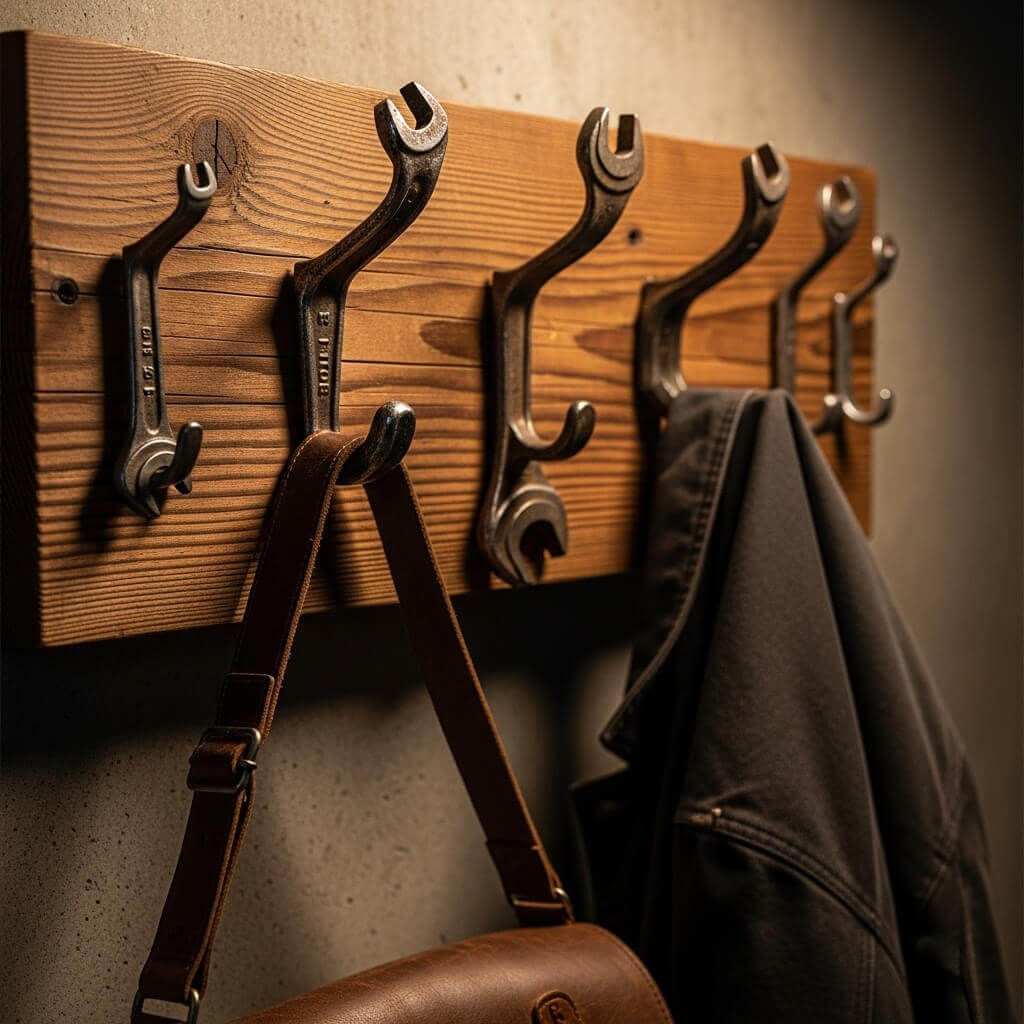
Bend old, large wrenches into “S” shapes using a vise (or have a helpful hardware store employee do it). Mount them to a board or directly to the wall for industrial-chic hooks in a garage or entryway.
Pro Tip
Scour flea markets for these. You can often get a bundle of old tools for a few bucks. A little rust adds character!
17. Cabinet Door Chalkboard/Tray
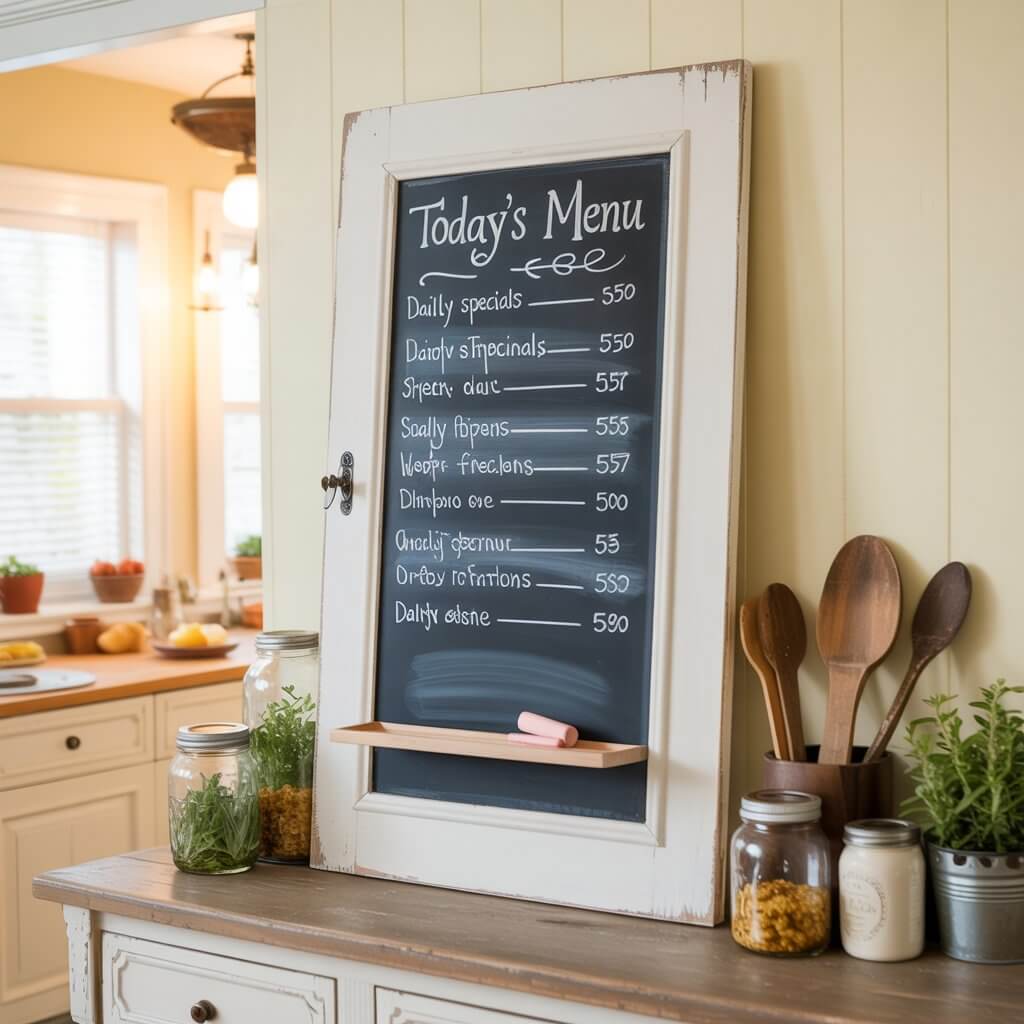
Take a flat cabinet door, paint the center panel with chalkboard paint, and attach a small ledge at the bottom for chalk. Prop it on a buffet for menus, or add handles to the sides to use as a serving tray.
Story Time
My first chalkboard paint project was… ambitious. A whole wall. Learn on something small like this. Trust me on this one.
18. Hanging Shelf from a Drawer
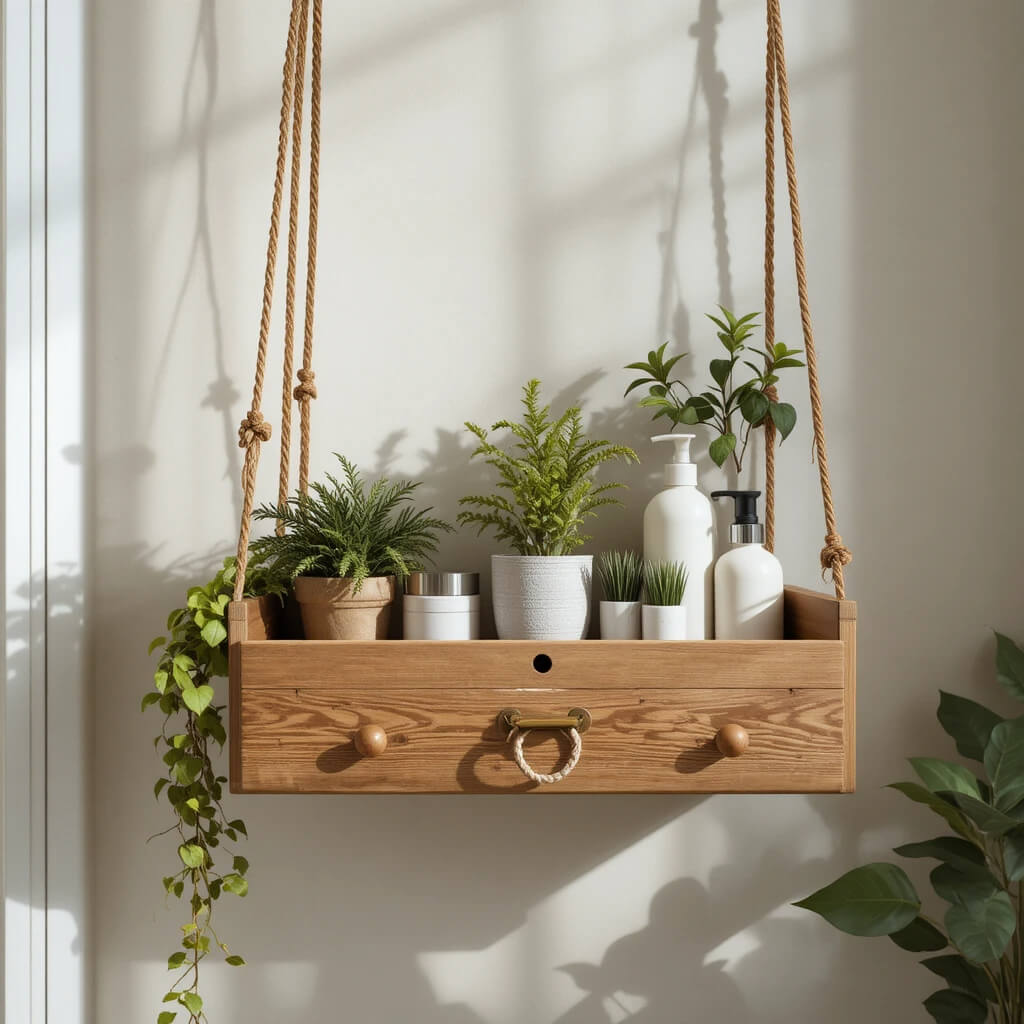
Attach sturdy ropes or leather straps to all four corners of a small drawer. Hang it from the ceiling or a wall hook for a floating shelf with built-in sides. It’s perfect for bathroom toiletries or balcony herb pots.
Personal Take
This is ideal for drawers with nice dovetail joints or pretty wood grain. Why hide that beauty inside a dresser?
19. Lamp Base from a Bottle/Vase
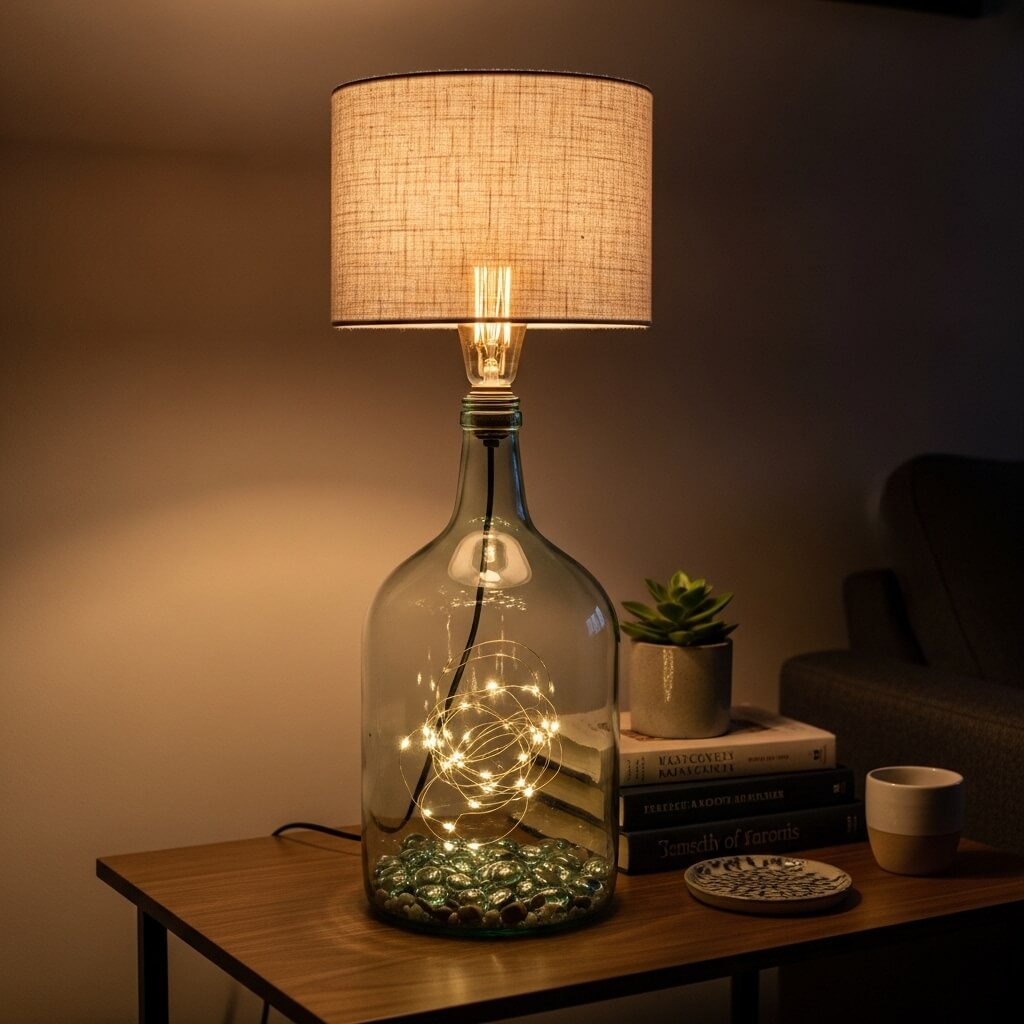
Buy a simple lamp wiring kit from any craft store. Thread it through a interesting bottle, decanter, or vase, and assemble the socket and harp on top. You’ve just made custom lighting for under $20.
Pro Move
Play with scale. A giant vintage glass vinegar bottle makes a stunning floor lamp base. Go big or go home.
20. Patio Table from a Cable Spool
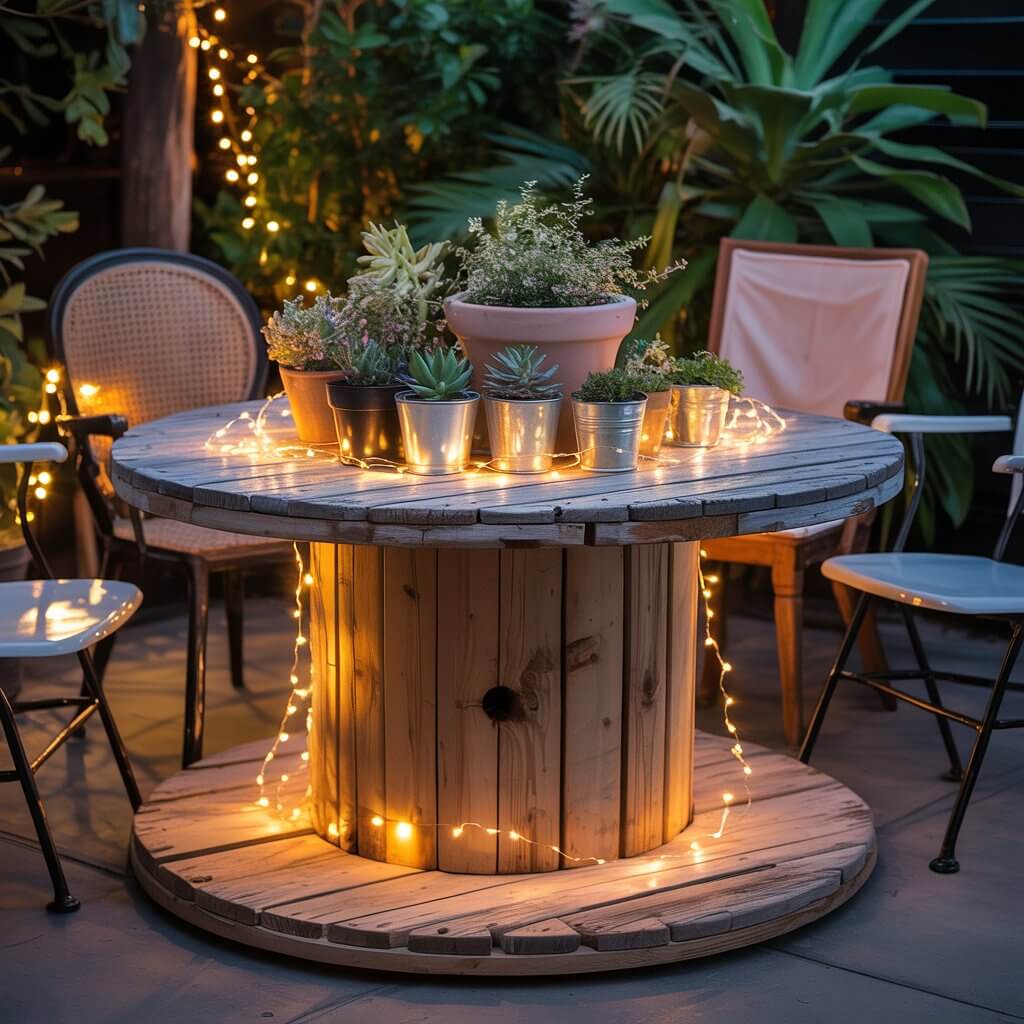
Yes, the classic. Those giant wooden cable spools are often free for the taking from utility companies. Sand it, seal it with outdoor polyurethane, and you have an instant, ultra-sturdy patio table.
Downside
They are a beast to move and can be rustic to a fault. But for zero-dollar outdoor dining? You can’t beat it. Add some fairy lights for instant ambiance.
Your Upcycling Adventure Starts Now
So, which idea got your DIY gears turning? The best part about upcycling is that there are no real rules, just possibilities hiding in plain sight.
You’ll make a few glorious messes, discover that sanding is weirdly therapeutic, and end up with something that has a story.
Start with the project that makes you smile, not the one that gives you an anxiety sweat. Now go raid your basement or hit a thrift store—your future favorite piece is waiting, and it probably just needs a little love (and maybe some spray paint). Send me pics of your wins!