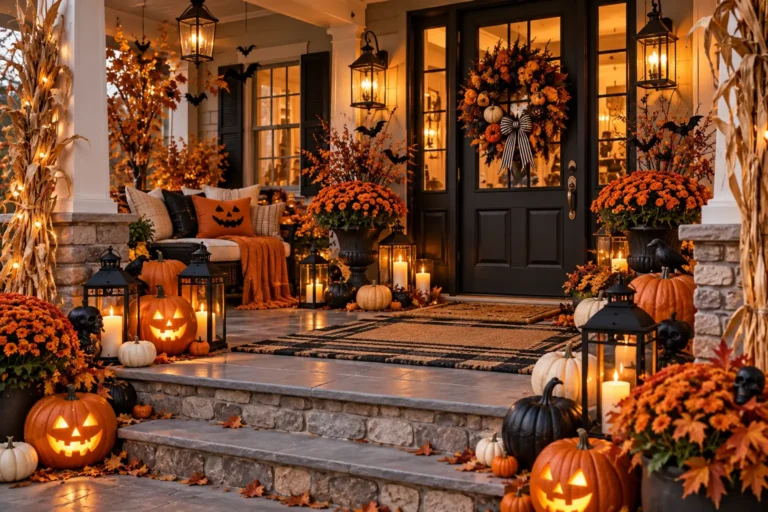
15 DIY Halloween Decor Ideas That Make Your Home Spooky and Stylish
Halloween decorating does not have to mean filling every corner with plastic skeletons and orange lights. With a little creativity, everyday materials can become charmingly creepy decorations that give your home personality without sacrificing style.
These DIY Halloween decor ideas combine spooky details with attractive colors, textures, and clever upcycling, making them perfect for anyone who wants a Halloween home that feels festive rather than chaotic.
1. Create a Dramatic DIY Halloween Front Door

Your front door is the perfect place to make a first impression. Instead of buying an expensive Halloween wreath, create your own dramatic entrance using a simple grapevine, foam, or wire wreath base.
Wrap the base with black ribbon, faux cobwebs, dark fabric, or strips of gauze. Add artificial black branches, dried flowers, miniature pumpkins, and a few plastic spiders. For a more elegant look, use mostly black and neutral tones with one accent color, such as deep burgundy or metallic gold.
Want something more unusual? Turn your wreath into a spooky “Beware” display by adding an old-looking wooden sign. You can make one from a scrap piece of wood, paint it in a distressed finish, and lightly sand the edges to give it an aged appearance.
The best DIY Halloween decor ideas are often the ones that use simple materials in unexpected ways. A homemade wreath can look just as impressive as a store-bought decoration when the colors and textures are thoughtfully layered.
Quick tip: Keep the wreath visually balanced. Choose one main feature, such as a skull, raven, pumpkin, or oversized bow, and use smaller decorations around it.
2. Turn Glass Jars Into Creepy Halloween Lanterns

Do not throw away empty glass jars. They can become atmospheric Halloween lanterns with very little effort.
Clean several jars and remove their labels. Wrap sections of the outside with cheesecloth, gauze, or translucent paper. You can also paint simple ghost faces, spiderwebs, or eerie eyes on the glass using washable or glass-safe paint.
Place battery-operated tea lights inside each jar. Avoid real candles, especially if the decorations will be surrounded by fabric or placed where children and pets can reach them.
For a mysterious effect, arrange jars of different sizes together. Add small branches, faux moss, miniature pumpkins, or scattered autumn leaves around the base.
These lanterns work beautifully on mantels, dining tables, bookshelves, porches, and windowsills. They also make inexpensive party decorations because you can create several at once.
For an especially polished display, stick to a limited color palette. Black, smoky gray, cream, and warm amber create a sophisticated haunted-house atmosphere without making the room feel overcrowded.
3. Make a Haunted Portrait Gallery

One of the easiest ways to make a hallway or staircase feel haunted is to create a gallery of eerie portraits.
Start with inexpensive thrift-store frames or frames you already own. Paint them black, dark brown, or antique gold. Then print vintage-style portraits from copyright-safe or public-domain sources, or create your own mysterious characters using family photographs and creative editing.
For a supernatural effect, place a piece of translucent tracing paper or vellum over selected parts of the portrait. You can also add subtle cracks, shadowy eyes, or handwritten dates to make the images look as though they came from an old haunted mansion.
Hang several portraits together in different sizes. Slightly crooked frames can actually make the arrangement feel more authentic and unsettling.
If you want the display to look stylish rather than gimmicky, avoid making every portrait frightening. A mixture of serious, mysterious, and slightly eerie faces creates a more believable haunted-gallery effect.
Among the most versatile DIY Halloween decor ideas, this one is especially useful because the finished display can transform an otherwise ordinary wall into a Halloween focal point.
4. Make Stylish Black Pumpkin Decorations

Pumpkins do not have to be bright orange to feel festive.
For a modern Halloween look, paint pumpkins matte black, charcoal gray, cream, or even muted metallic shades. Real pumpkins work beautifully, but craft pumpkins can also be reused year after year.
For extra detail, paint delicate spiderwebs, moons, stars, botanical patterns, or tiny bats onto the surface. Metallic gold or silver accents can make dark pumpkins look surprisingly elegant.
You can also stack pumpkins vertically beside your front door. Place the largest pumpkin at the bottom and gradually use smaller ones toward the top. Add dried branches or faux foliage around the arrangement.
If you prefer a minimalist style, choose three pumpkins in different sizes and place them together rather than decorating every pumpkin individually.
The key is contrast. A collection of dark pumpkins looks especially attractive against a light-colored wall, pale porch, wooden table, or cream-colored mantel.
5. Build a Spooky Halloween Mantel Display

The mantel is one of the best areas for experimenting with layered Halloween decorations.
Begin with a dark garland made from faux leaves, branches, black ribbon, or paper bats. Then add different heights using candlesticks, pumpkins, books, vases, and framed artwork.
For a dramatic centerpiece, place a large mirror or vintage-style frame behind the arrangement. You can lightly drape faux cobwebs across the corners to create an abandoned-house effect.
Battery-powered candles add warmth and atmosphere without the safety concerns of open flames. Choose several candle heights rather than using identical candles throughout the display.
For a stylish finish, include natural materials such as dried flowers, twigs, pinecones, and branches. These elements soften the darker decorations and connect Halloween with the autumn season.
When trying these DIY Halloween decor ideas, remember that decorating is about composition as much as individual objects. Vary height, texture, and shape to make the display interesting from across the room.
6. Create Floating Witch Hats With Lights

Floating witch hats are an easy project that can make a room feel instantly magical.
Purchase inexpensive black witch hats or make simple versions from black cardstock or lightweight fabric. Attach clear fishing line to the top of each hat and suspend them from the ceiling at different heights.
For an enchanting glow, place small battery-powered LED lights inside the hats. When the lights are switched on, the hats appear to float mysteriously above the room.
Hang three, five, or seven hats together over a dining table, entryway, staircase, or party area. Vary their angles slightly so the arrangement looks natural.
This project is especially effective in rooms with plain ceilings because the decorations draw the eye upward.
If you are decorating a home with a more sophisticated style, choose plain black hats without excessive glitter or printed designs. The simple silhouette creates a dramatic effect while keeping the overall look clean.
7. Turn Your Staircase Into a Haunted Stairway

A staircase naturally creates movement through the home, making it a fantastic location for Halloween decorating.
Wrap the handrail with black gauze, faux ivy, or dark ribbon. Add small bats, spiders, autumn leaves, or miniature pumpkins along the railing.
For an extra spooky effect, cut bat silhouettes from black cardstock and attach them to the wall so they appear to be flying upward. Start with a few small bats and gradually make them larger as they approach the top of the staircase.
You can also place LED candles on the steps, provided they are safely positioned and cannot create a tripping hazard.
Another simple idea is to create a “haunted family” display by hanging small framed portraits along the staircase. Add handwritten labels with mysterious names and dates for a storytelling element.
The best DIY Halloween decor ideas often work because they transform architectural features rather than simply adding objects to tables. A staircase already has height and movement, so you can use those qualities to create drama.
8. Make a Creepy Apothecary Shelf

Give an ordinary bookshelf or cabinet the appearance of an old-fashioned witch’s apothecary.
Collect small glass bottles, jars, vases, and containers. Fill them with harmless decorative materials such as dried herbs, colored water, faux moss, twigs, beads, or paper labels.
Create fictional labels with names such as “Moon Dust,” “Raven Feathers,” “Midnight Elixir,” or “Spider Silk.” For an aged appearance, use cream-colored paper and slightly roughen the edges.
Arrange the bottles among old books, candles, dried flowers, small pumpkins, and faux bones. Keep the arrangement varied rather than lining everything up perfectly.
If you want a more sophisticated display, use amber, clear, and dark glass bottles instead of brightly colored plastic containers.
This decoration is particularly fun because it can be customized to your personality. A plant lover might create a botanical witch’s cabinet, while a gothic-style enthusiast could create a darker Victorian-inspired display.
9. Design a Halloween Table Centerpiece

A Halloween dinner does not need a plastic tablecloth and cartoon decorations. Create a stylish centerpiece using a combination of seasonal and spooky elements.
Start with a neutral table runner in black, charcoal, cream, or natural linen. Add a cluster of pumpkins, candleholders, dried flowers, and branches down the center of the table.
Use black or dark-colored plates if you have them, or simply add black napkins to your existing dinnerware. Fold the napkins neatly and place a small faux spider, dried leaf, or miniature pumpkin on top.
For the centerpiece, use candles at different heights to create a warm glow. Battery-operated candles are particularly useful if the table will remain decorated for several hours.
A few carefully selected decorations can create much more impact than covering the entire table. Leave enough open space for serving dishes, plates, and conversation.
One advantage of these DIY Halloween decor ideas is that many pieces can transition into Thanksgiving or autumn decorating. Dried branches, neutral pumpkins, candles, and warm-toned foliage are useful long after Halloween is over.
10. Make a Giant DIY Spiderweb

A giant spiderweb can turn an empty wall, porch, window, or corner into an instant Halloween scene.
The easiest method is to use thick white yarn or cotton rope. Start by creating several long lines that cross at a central point. Then connect those lines with curved sections of yarn, working from the center outward.
Do not worry about making the web perfectly symmetrical. Real spiderwebs have irregular shapes, and slight imperfections make your decoration look more convincing.
Add one oversized faux spider in the center or slightly off to one side. For a dramatic porch display, stretch the web across a railing or between columns.
Indoors, a giant web can be used behind a Halloween dessert table or on an otherwise empty wall.
To make the web look less artificial, add a few smaller spiders at different points rather than placing them all in one area.
11. Create Ghost Decorations From Old Fabric

Old white sheets, pillowcases, or lightweight fabric can be transformed into simple ghost decorations.
Cut the fabric into suitable sizes and drape each piece over a lightweight ball or rounded object. Secure the fabric underneath and add simple facial features using black fabric, felt, or removable markers.
Hang the ghosts from tree branches, a porch, ceiling hooks, or a covered patio.
For a more sophisticated version, skip the traditional face and allow the fabric to create an abstract ghostly shape. Place several fabric ghosts together at different heights for a soft, floating effect.
You can also place small battery-operated lights beneath or inside them to make them glow at night.
This is one of the most budget-friendly DIY Halloween decor ideas because it requires very few materials. It is also an excellent project for families because children can help create faces and decorate the fabric.
12. Make a Bat Wall From Cardstock

If you want maximum visual impact with minimal spending, create a wall of flying bats.
Use black cardstock and cut bats in several sizes. You can create a simple bat template and trace it repeatedly, or print templates before cutting.
Attach the bats to the wall using removable adhesive. Begin with a small group near one point and gradually spread them outward, creating the illusion that the bats are flying across the room.
A bat wall looks fantastic behind a sofa, around a fireplace, beside a staircase, or near an entryway.
For a more dynamic effect, slightly bend the wings of some bats so they appear three-dimensional. Use larger bats closer to the center and smaller ones farther away.
The beauty of this project is that it requires no expensive supplies. A few sheets of cardstock can create a decoration large enough to cover an entire wall.
13. Create a Haunted Mirror

Give an ordinary mirror a mysterious Halloween makeover.
If you have an old mirror with an interesting frame, lightly decorate the frame with faux cobwebs, dried branches, or black ribbon. Avoid permanently altering an expensive mirror.
For the glass itself, use removable window markers or a washable glass-writing product to create phrases such as “Who’s There?” or “Don’t Look Behind You.”
Another option is to create a foggy appearance using removable decorative film or strategically placed translucent material around the edges.
Add dim LED lighting nearby so the mirror becomes part of the room’s atmosphere rather than simply another decoration.
For a stylish haunted-house look, choose a restrained design. A dark frame, a few cobwebs, and one mysterious message can be much more effective than covering the entire mirror.
14. Turn Ordinary Bottles Into Halloween Vases

Before recycling interesting bottles, consider giving them a second life as Halloween decorations.
Remove the labels and clean the bottles thoroughly. Paint them black, cream, gray, or deep burgundy. You can leave some sections unpainted to create contrast.
Add dried flowers, wheat, bare branches, or faux black roses. Group bottles in odd numbers, such as three or five, and place them on a mantel, dining table, console, or bookshelf.
For an old-world look, attach handmade paper labels or tie pieces of twine around the necks.
Clear bottles can also become simple potion-style decorations when filled with water and a small amount of washable food coloring. Always keep decorative liquids away from children and pets, and avoid using containers that could be mistaken for food or drinks.
This project demonstrates why the most effective DIY Halloween decor ideas do not have to be complicated. A few recycled bottles and dried branches can create a beautiful display with a surprisingly high-end appearance.
15. Build a Spooky Outdoor Pumpkin Path

Finish your Halloween decorating with a simple path leading toward your front door.
Arrange pumpkins, lanterns, faux tombstones, branches, or small handmade signs along the walkway. You do not need dozens of decorations. A thoughtfully spaced collection of objects can create a much stronger visual effect.
For example, place a large pumpkin near the beginning of the path, add smaller pumpkins farther along, and finish with a larger grouping beside the front door.
Use battery-powered lanterns or outdoor-rated lights to illuminate the walkway. Safety should always come first: keep decorations away from areas where people walk, avoid loose electrical cords, and make sure nothing blocks steps or entrances.
For a stylish outdoor display, mix traditional orange pumpkins with white, green, or dark-painted pumpkins. Add natural elements such as hay, dried corn stalks, branches, and autumn leaves.
This combination gives your entrance a warm seasonal feeling while still delivering plenty of Halloween personality.
How to Make DIY Halloween Decor Look Stylish Instead of Cluttered
The secret to successful Halloween decorating is not having the most decorations. It is knowing how to combine them.
Start by choosing a color palette. Traditional orange and black can look fantastic, but you can also experiment with black and cream, charcoal and burgundy, or black and metallic gold.
Next, repeat a few materials throughout your home. If you use black pumpkins in the living room, echo that color in your entryway. If you decorate with dried branches, use them again on the dining table.
Texture is equally important. Combine smooth pumpkins with rough wood, soft fabric, glass bottles, dried flowers, and woven baskets. The contrast makes simple decorations look more interesting.
Finally, create focal points instead of decorating every surface. A dramatic mantel, decorated front door, spooky staircase, and beautiful dining table may be enough to make the entire home feel festive.
How to Decorate for Halloween on a Budget
You do not need a large decorating budget to create an impressive Halloween home.
Before shopping, walk through your house and collect items you could repurpose. Glass jars, old picture frames, unused fabric, cardboard, empty bottles, baskets, candles, books, and branches can all become Halloween decorations.
Thrift stores are also useful for finding frames, vases, candlesticks, trays, and unusual objects that can be transformed with a little paint.
Another money-saving strategy is to buy a few reusable base pieces rather than dozens of themed decorations. Black fabric, neutral pumpkins, LED candles, and artificial branches can be used in different arrangements every Halloween.
DIY projects also allow you to customize the scale. Instead of buying one expensive oversized decoration, you can create several smaller decorations that work together as a complete display.
Simple Halloween Decorating Tips for a More Polished Look
When using these DIY Halloween decor ideas, keep a few design principles in mind.
Choose a theme. Decide whether your home will feel gothic, elegant, haunted, whimsical, rustic, or family-friendly. Mixing every Halloween style at once can make a room feel chaotic.
Use repetition. Repeat colors, shapes, and materials throughout the room. Three black pumpkins placed in different areas will feel more intentional than three unrelated decorations.
Vary height. Place some objects on books, trays, tables, or stands so everything is not sitting at the same level.
Leave breathing room. Empty space is useful. It allows your favorite decorations to stand out.
Layer decorations. Place large items toward the back, medium pieces in the middle, and smaller objects in front. This creates depth and makes displays look professionally styled.
Think about lighting. Soft, warm lighting can transform even simple Halloween decorations. LED candles, lanterns, and string lights are easy ways to create atmosphere.
Prioritize safety. Keep candles, cords, small objects, and fragile decorations away from children and pets. Use outdoor-rated lighting outside and keep walkways clear.
Make Your Halloween Decorations Tell a Story
The most memorable Halloween homes usually feel like they have a story behind them.
Instead of placing random decorations around a room, imagine that your home is an old mansion, mysterious botanical laboratory, enchanted cottage, haunted library, or witch’s apothecary.
Then choose decorations that support that story.
For a haunted library, use old books, antique-looking frames, candles, ravens, and dusty-looking bottles. For an enchanted garden, combine pumpkins, branches, moss, dried flowers, lanterns, and bats. For a modern Halloween look, keep the decorations minimal and use black, white, metallic accents, and geometric shapes.
This storytelling approach makes your decorating decisions easier because every object has a purpose.
Final Thoughts
The best DIY Halloween decor ideas prove that spooky decorating can be creative, affordable, and genuinely beautiful. You do not need to completely transform your home or spend a fortune on seasonal decorations. A few painted pumpkins, homemade lanterns, eerie portraits, floating witch hats, or a dramatic front-door display can make a huge difference.
Start with one or two projects that match your home’s existing style, then build your Halloween look gradually. Use items you already own, repurpose everyday materials, and focus on atmosphere rather than quantity. Most importantly, have fun with it. Halloween is the perfect excuse to experiment, get creative, and give your home a little mysterious personality.

15 DIY Halloween Decor Ideas That Make Your Home Spooky and Stylish
Transform your home for Halloween with these 15 DIY Halloween decor ideas that combine spooky details with stylish, modern design. Discover creative homemade Halloween decorations for living rooms, entryways, mantels, tables, and outdoor spaces using affordable materials and easy projects. Perfect for creating a festive Halloween atmosphere without sacrificing your home's aesthetic. #HalloweenDecor #DIYHalloween #HalloweenIdeas #HomeDecor #HalloweenDIY
Pin it on Pinterest